You want to extend your wooden fence post height, but you don’t have the tools or know-how. This quick tutorial will show you a step by step process for how to properly expand your wooded fencing with PVC pipe and some hardware store supplies.
The “how to extend a wooden fence post” is a tutorial that will teach you how to raise the height of your wooden fence posts. This tutorial includes step-by-step instructions on how to do this, as well as pictures and diagrams.
The most typical reason for extending your fence post is to get additional privacy or security with a higher fence.
Most communities allow you to build a fence up to 8 feet tall without requiring a permission. Some folks who have a fence that is less than 6 feet tall are aware that their neighbors can see into their yard.
If you have a six-foot fence, lattice or other fencing material might be used to extend it two additional feet. The second issue is if your post decayed in the middle or was broken by someone. In the event that the post has completely rotted away, you will need to remove it.
To preserve the same height, you’ll need a technique to cut out the broken/rotten post and replace it with a new one. Any of the options below will work to lengthen your current fence post for any purpose.
Contents Table of Contents
- Types of Fence Extensions
- Connector in metal
- Connector made of wood
- Through bolted half-lap joint
Contents
Types of Fence Extensions
You may lengthen your wooden fence post in three different ways. The two simple methods are to use metal tie fasteners on both the front and rear of both posts, or to use a wood face board on both the front and back of both posts.
The third method is a little more complicated since each post must have a half lap joint and then be connected with through bolts. Let’s take a closer look at each technique.
Connector in metal
It’s a large piece of strong metal that spans over both front and rear sides of the posts to strengthen the joint and transmit tension loads. It’s termed a heavy duty tie plate, mending plate, or tie strap.
This one from Simpson is 12 gauge, which is thicker than the 20 gauge ones available at your local lumber shop. For future reference, the lower the number, the thicker the gauge of metal.


I also enjoy that it’s 16″ long, which gives me 8″ on each post to aid with weight transmission. To give this strap additional stability, I would use structural connections instead of conventional nails or screws.
I’ve used structural nails before.


as well as structural screws


and discovered that the screws were easier to install and that there were fewer injuries from stray hammer blows to the thumb or knuckle while holding the nail.
Nails will also slide sideways on you if they come across a random wood knot. Both are structurally sound, which is why you want to keep the two posts together.
Items to Consider

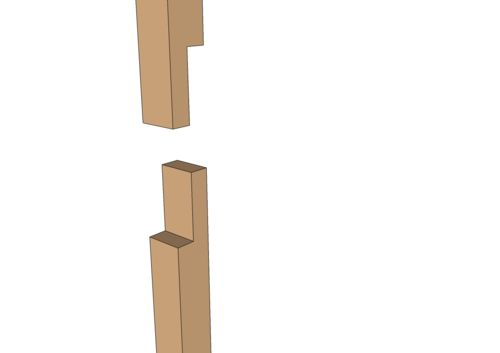
It’s not difficult to make a half-lap joint, but you must pay attention to your dimensions. When it comes to cutting, the old adage “measure twice, cut once” is always true. I occasionally double-check my measurements and yet make a wrong cut now and again.
Your half-lap joint should be the same on both posts and should be around 6-8 inches down on the first post and the same on the top post.
Because you’re cutting half of the material off each post a set distance down from each post, it’s called a half lap. When you connect them, you’ll have a full-thickness joint that spans both posts.
In this scenario, a diagram shows how two vertical posts are linked using two or more through bolts. This Old House’s post demonstrates how to make a half lap joint using a circular saw and a sharp chisel.
The objective is to get rid of the residual wood between the saw kerfs as neatly as possible. Any bumps from the saw kerfs may be cleaned off using a wood rasp. To correctly attach the posts, you’ll need at least a 38-thick, 4-inch-long galvanized bolt.
This video also demonstrates a hybrid approach of cutting using a circular saw on both sides and a hand saw for the remainder of the wood.
This is my favourite approach, and it is quicker than cutting a lot of kerfs, but the kerf method was really simple and required little expertise when I first started using a circular saw.
I hope this article has detailed the three alternative options for extending your wood fence post.
I believe the technique you choose will depend on the style of your present fence and the type of the extension you’ll be building, or whether you’re connecting two posts for anything other than a fence.
If your posts already have face boards, the second option would fit in well. If you don’t already have face boards, the metal hardware plates are a faster option.
Finally, if you’re extending two posts for something like a deck, the half lap junction is the most structurally solid option.
To our British readers, there seems to be a metal sleeve that may be used to expand wooden fence posts. I wish this product was accessible in the United States, but I’ve looked everywhere and haven’t been able to locate it.
The “wood fence height extension kit” is a product that can be used to extend the height of your wooden fence. The process for installing this kit is detailed in the article.
Frequently Asked Questions
How can I extend the height of my wooden post?
A: You can use a saw to cut the wooden post into smaller pieces, and then nail it onto your wall.
How do I increase the height of my wood fence?
A: To increase the height of your fence, you will need to make a support structure underneath it and then add supports on top of that. This is done by digging out large holes in front of each post, up to about 3 feet deep. The bottom posts are then placed into these holes, with their tops resting against the ground for stability. Then 2x4s or longer wood boards are laid across these posts horizontally and nailed down at an angle so they form angles next to one another as shown below:
How do I lengthen a post?
A: To lengthen a post, press enter twice.
Related Tags
- how to extend a 4×4 post vertically
- fence post extender
- 4×4 wood fence post extender
- cheap way to extend fence height
- fence extension for privacy